| (10 intermediate revisions by the same user not shown) | |||
| Line 9: | Line 9: | ||
|team_members=Trevor Wright<br>Adam Lewis<br>Patricia Wright<br>Louise Hemstock |
|team_members=Trevor Wright<br>Adam Lewis<br>Patricia Wright<br>Louise Hemstock |
||
|from=Nottingham |
|from=Nottingham |
||
| + | |stats=<gallery> |
||
| + | Ironside3 s9 stats.png|Series 9 |
||
| + | Ironside3 s8 stats.png|Series 8 |
||
| + | </gallery> |
||
|weight=109kg |
|weight=109kg |
||
|dimensions= |
|dimensions= |
||
|speed=12mph |
|speed=12mph |
||
| − | |power= |
+ | |power=4x Lithium Polymer (22v) |
| + | |drive=2x brushed DC motors |
||
|weapons=Bar spinner |
|weapons=Bar spinner |
||
}} |
}} |
||
| Line 24: | Line 29: | ||
==Design== |
==Design== |
||
[[File:Ironside 3.png|thumb|left|Ironside3 in Series 8]] |
[[File:Ironside 3.png|thumb|left|Ironside3 in Series 8]] |
||
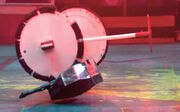
| − | Ironside3 was two-wheel driven, and somewhat curved in shape. It was armed with a one-metre diameter, 18kg [[Bar spinners|spinning bar]], which spins at 1500rpm for devastating damage. The bar was initially planned to weigh 35kg, and was quoted as such on the official website, but this was not possible due to weight restrictions. Besides its spinning bar, Ironside3 also featured a [[self-righting mechanism|srimech]] bar, lifting the robot sideways, similar to the srimechs of [[Hypno-Disc]] and [[13 Black]], although with a more triangular shape. However, the srimech was extremely slow in Series 8, and failed to right the robot in its only opportunity. The robot was made from 5mm HARDOX steel, and in Series 8 was unpainted, keeping the traditional 'HARDOX brown', with the robot's name painted on top. Ironside3 entered its first battle completely untested. |
+ | Ironside3 was two-wheel driven, and somewhat curved in shape. It was armed with a one-metre diameter, 18kg [[Bar spinners|spinning bar]], which spins at 1500rpm for devastating damage. The bar was initially planned to weigh 35kg, and was quoted as such on the official website, but this was not possible due to weight restrictions, and the lighter 18kg bar was created as a result. The original 35kg bar can still be seen in Ironside3's VT for Series 8. Besides its spinning bar, Ironside3 also featured a [[self-righting mechanism|srimech]] bar, lifting the robot sideways, similar to the srimechs of [[Hypno-Disc]] and [[13 Black]], although with a more triangular shape. However, the srimech was extremely slow in Series 8, and failed to right the robot in its only opportunity. The robot was made from 5mm HARDOX steel, and in Series 8 was unpainted, keeping the traditional 'HARDOX brown', with the robot's name painted on top. Ironside3 entered its first battle completely untested. |
{{quote|Nothing can damage us, we're worried about the mechanism falling apart when we hit something!|Trevor Wright}} |
{{quote|Nothing can damage us, we're worried about the mechanism falling apart when we hit something!|Trevor Wright}} |
||
[[File:Ironside3 series 9.png|thumb|left|Ironside3's turntable shot in Series 9]] |
[[File:Ironside3 series 9.png|thumb|left|Ironside3's turntable shot in Series 9]] |
||
| Line 37: | Line 42: | ||
==Qualification== |
==Qualification== |
||
| + | [[File:Ironside3 heavier bar.jpg|thumb|Ironside3 in its Series 8 VT, fitted with the planned 35kg bar spinner which could not be used]] |
||
With Series 8 being filmed only weeks after applications closed, Ironside3 first had to be built within the time-frame of one month in order for it to compete in the series, having been accepted to compete. A largely similar Ironside3 was also accepted for Series 9, while Trevor Wright's [[Meggamouse]] would later join the selection of competitors as a reserve. |
With Series 8 being filmed only weeks after applications closed, Ironside3 first had to be built within the time-frame of one month in order for it to compete in the series, having been accepted to compete. A largely similar Ironside3 was also accepted for Series 9, while Trevor Wright's [[Meggamouse]] would later join the selection of competitors as a reserve. |
||
| Line 76: | Line 82: | ||
{{quote|They're back with an upgraded robot and a steely resolve to win.|Angela Scanlon introduces Ironside3 before its Group Battle}} |
{{quote|They're back with an upgraded robot and a steely resolve to win.|Angela Scanlon introduces Ironside3 before its Group Battle}} |
||
Ironside3 competed in Heat 4, with a Group Battle which saw it face Pulsar once again, as well as another spinner, [[Apex]], and the experienced [[Crushtacean]]. |
Ironside3 competed in Heat 4, with a Group Battle which saw it face Pulsar once again, as well as another spinner, [[Apex]], and the experienced [[Crushtacean]]. |
||
| − | [[File:Ironside3 Crushtacean.jpg|thumb |
+ | [[File:Ironside3 Crushtacean.jpg|thumb|Ironside3 connects with a killer blow to Crushtacean]] |
Ironside3 moved away into space early on to gets its bar up to speed, before landing a blow on Crushtacean which ripped a chunk of its armour away and left it immobilised on the Flame Pit. Ironside3 was then rammed by Pulsar, which followed through with a charge after immobilising Apex. With Crushtacean and Apex immobilised, Ironside3 spun around in a victory dance, and its progression through to the Head-to-Heads with Pulsar was soon confirmed, as cease was called on the battle. |
Ironside3 moved away into space early on to gets its bar up to speed, before landing a blow on Crushtacean which ripped a chunk of its armour away and left it immobilised on the Flame Pit. Ironside3 was then rammed by Pulsar, which followed through with a charge after immobilising Apex. With Crushtacean and Apex immobilised, Ironside3 spun around in a victory dance, and its progression through to the Head-to-Heads with Pulsar was soon confirmed, as cease was called on the battle. |
||
{{quote|Hugely impressive, Ironside3 - very, very good.|Jonathan Pearce}} |
{{quote|Hugely impressive, Ironside3 - very, very good.|Jonathan Pearce}} |
||
Ironside3 was safely through, but it had sustained damage from Pulsar during the Group Battle, as its bar spinner was clashing with the robot's surface, which needed to be repaired. Ironside3's first Head-to-Head battle was also against Pulsar - with Trevor Wright wary of his opponent after Ironside3's defeat to [[Team Ranglebots|Team Ranglebots']] machine in the last series. |
Ironside3 was safely through, but it had sustained damage from Pulsar during the Group Battle, as its bar spinner was clashing with the robot's surface, which needed to be repaired. Ironside3's first Head-to-Head battle was also against Pulsar - with Trevor Wright wary of his opponent after Ironside3's defeat to [[Team Ranglebots|Team Ranglebots']] machine in the last series. |
||
{{quote|I'm not quite sure how we're going to approach this one. Probably very slowly, very gingerly, very measured.|Trevor Wright before Ironside3's first Head-to-Head battle against Pulsar}} |
{{quote|I'm not quite sure how we're going to approach this one. Probably very slowly, very gingerly, very measured.|Trevor Wright before Ironside3's first Head-to-Head battle against Pulsar}} |
||
| − | [[File:Pulsar vs Ironside3 S9.jpg|thumb|Ironside3 recoils away from Pulsar]] |
+ | [[File:Pulsar vs Ironside3 S9.jpg|thumb|left|Ironside3 recoils away from Pulsar]] |
Ironside3 immediately found itself under pressure from [[Shunt]] as it moved into the House Robot's CPZ while trying to get its weapon up to speed. Ironside3 continued its shaky start as it missed Pulsar's side with a drive and followed through onto the Floor Flipper, where it was thrown up into the air. Ironside3 landed back on its wheels but was quickly under pressure again as Pulsar came in with a ram that slammed Ironside3 into the Arena Tyre and descended the Pit. Ironside3 was then thrown into Sir Killalot's CPZ after a head to head blow, and Pulsar - with its drum deliberately stopped to prevent overheating - halted Ironside3's bar with another drive. |
Ironside3 immediately found itself under pressure from [[Shunt]] as it moved into the House Robot's CPZ while trying to get its weapon up to speed. Ironside3 continued its shaky start as it missed Pulsar's side with a drive and followed through onto the Floor Flipper, where it was thrown up into the air. Ironside3 landed back on its wheels but was quickly under pressure again as Pulsar came in with a ram that slammed Ironside3 into the Arena Tyre and descended the Pit. Ironside3 was then thrown into Sir Killalot's CPZ after a head to head blow, and Pulsar - with its drum deliberately stopped to prevent overheating - halted Ironside3's bar with another drive. |
||
{{quote|Good tussle, this. Very good tussle.|Jonathan Pearce}} |
{{quote|Good tussle, this. Very good tussle.|Jonathan Pearce}} |
||
| − | [[File:Pulsar vs Ironside 3 S9.jpg|thumb |
+ | [[File:Pulsar vs Ironside 3 S9.jpg|thumb|Pulsar and Ironside3 lock horns]] |
Ironside3 continued to retreat from the aggressive Pulsar and was thrown by the Floor Flipper for a second time, and Ironside3's weapon then came to a stop. Pulsar moved perilously close to the Pit as the battle developed into a pushing match, before Pulsar lost drive on one side. Pulsar was forced to self-right after being dropped onto its back by Sir Killalot, while Ironside3's bar had started to spin again, and it used its weapon to strike Pulsar. Ironside3 started to spin around in victory as Pulsar spun up its weapon again in order to use the gyroscopic effect to help give Pulsar better mobility. Louise Hemstock then noticed that the countdown timer had started in their booth, and instructed Adam Lewis to display Ironside3's mobility while Pulsar was being counted out. |
Ironside3 continued to retreat from the aggressive Pulsar and was thrown by the Floor Flipper for a second time, and Ironside3's weapon then came to a stop. Pulsar moved perilously close to the Pit as the battle developed into a pushing match, before Pulsar lost drive on one side. Pulsar was forced to self-right after being dropped onto its back by Sir Killalot, while Ironside3's bar had started to spin again, and it used its weapon to strike Pulsar. Ironside3 started to spin around in victory as Pulsar spun up its weapon again in order to use the gyroscopic effect to help give Pulsar better mobility. Louise Hemstock then noticed that the countdown timer had started in their booth, and instructed Adam Lewis to display Ironside3's mobility while Pulsar was being counted out. |
||
| − | [[File:Ironside3 Pulsar.jpg|thumb|Both robots move dangerously close to the Pit of Oblivion]] |
+ | [[File:Ironside3 Pulsar.jpg|thumb|left|Both robots move dangerously close to the Pit of Oblivion]] |
{{quote|Now, there seems to be confusion here. Ironside3 think Pulsar's has been counted out but Pulsar is still mobile. Cease has not been called - the fight is still on.|Jonathan Pearce}} |
{{quote|Now, there seems to be confusion here. Ironside3 think Pulsar's has been counted out but Pulsar is still mobile. Cease has not been called - the fight is still on.|Jonathan Pearce}} |
||
Unbeknown to [[Team Outlaw]], the judges had cancelled their timer after Pulsar displayed enough activity to count it as mobile, but the abandonment of the countdown was not translated to the Ironside3 booth, which lead them to believe that Pulsar was counted out. Because of this, Ironside3 did not attack Pulsar in the remaining time in the battle, and the battle went to a Judges' decision. |
Unbeknown to [[Team Outlaw]], the judges had cancelled their timer after Pulsar displayed enough activity to count it as mobile, but the abandonment of the countdown was not translated to the Ironside3 booth, which lead them to believe that Pulsar was counted out. Because of this, Ironside3 did not attack Pulsar in the remaining time in the battle, and the battle went to a Judges' decision. |
||
{{quote|Passions will rise high either side for this Judges' decision - I would not like to be in their shoes.|Jonathan Pearce}} |
{{quote|Passions will rise high either side for this Judges' decision - I would not like to be in their shoes.|Jonathan Pearce}} |
||
Not shown on television, the judges unanimously decided that Pulsar had won the battle, earning it two points. However, at this point Team Outlaw revealed the technical fault of their countdown timer, information which was passed onto the Judges, who offered a compromise which saw both robots awarded two points each, with no official victor, a compromise which Team Outlaw were satisfied with. |
Not shown on television, the judges unanimously decided that Pulsar had won the battle, earning it two points. However, at this point Team Outlaw revealed the technical fault of their countdown timer, information which was passed onto the Judges, who offered a compromise which saw both robots awarded two points each, with no official victor, a compromise which Team Outlaw were satisfied with. |
||
| − | [[File:Judges decision Ironside3.jpg|thumb |
+ | [[File:Judges decision Ironside3.jpg|thumb|Noel Sharkey explains the final decision to Team Outlaw]] |
{{quote|I pressed the button and it cancelled on our screen - the countdown. But I've been up there and you got [sic] countdown continued. So, it wasn't fair, so what we're going to do is we're going to award both teams two points.|Noel Sharkey explains the judges' ruling to Trevor Wright and Adam Lewis}} |
{{quote|I pressed the button and it cancelled on our screen - the countdown. But I've been up there and you got [sic] countdown continued. So, it wasn't fair, so what we're going to do is we're going to award both teams two points.|Noel Sharkey explains the judges' ruling to Trevor Wright and Adam Lewis}} |
||
Ironside3's second Head-to-Head was against [[Wyrm]], which replaced [[Frostbite]] after it was damaged beyond repair by [[Supernova]]. |
Ironside3's second Head-to-Head was against [[Wyrm]], which replaced [[Frostbite]] after it was damaged beyond repair by [[Supernova]]. |
||
| − | [[File:Ironside3 Wyrm.jpg|thumb|Ironside3 rips away Wyrm's front wedge]] |
+ | [[File:Ironside3 Wyrm.jpg|thumb|left|Ironside3 rips away Wyrm's front wedge]] |
Ironside3 started the battle by moving away from Wyrm before its weapon was up to speed. Ironside3 then moved towards its opponent and connected with a blow which ripped Wyrm's front wedge off. A side attack on Wyrm while it was in Shunt's CPZ left one of Wyrm's side panels and a wheel hanging off before the next attack from Ironside3 knocked it off completely. |
Ironside3 started the battle by moving away from Wyrm before its weapon was up to speed. Ironside3 then moved towards its opponent and connected with a blow which ripped Wyrm's front wedge off. A side attack on Wyrm while it was in Shunt's CPZ left one of Wyrm's side panels and a wheel hanging off before the next attack from Ironside3 knocked it off completely. |
||
{{quote|That's a wheel off, but he's still going!|Louise Hemstock}} |
{{quote|That's a wheel off, but he's still going!|Louise Hemstock}} |
||
| − | [[File:Ironside3 Wyrm 1.jpg|thumb |
+ | [[File:Ironside3 Wyrm 1.jpg|thumb|Ironside3 removes a second wheel from Wyrm]] |
Now on three wheels, Wyrm continued to limp around, with one more hit rendering Wyrm immobile. Ironside3 then darted over the Pit, where it got itself stuck for a short period, before it got itself free and then knocked off another wheel from Wyrm. With Wyrm immobilised, cease was called, and Ironside3 picked up 3 points. |
Now on three wheels, Wyrm continued to limp around, with one more hit rendering Wyrm immobile. Ironside3 then darted over the Pit, where it got itself stuck for a short period, before it got itself free and then knocked off another wheel from Wyrm. With Wyrm immobilised, cease was called, and Ironside3 picked up 3 points. |
||
{{Dialogue a-b|Dara Ó Briain|You went back a couple of time too often I feel. There was at least one little nibble you took, just, I think, therapeutically for yourself.|Adam Lewis|He's got the other side - it's okay! So hopefully just working on one side isn't too bad!|The interview after Ironside3's successful knockout of Wyrm}} |
{{Dialogue a-b|Dara Ó Briain|You went back a couple of time too often I feel. There was at least one little nibble you took, just, I think, therapeutically for yourself.|Adam Lewis|He's got the other side - it's okay! So hopefully just working on one side isn't too bad!|The interview after Ironside3's successful knockout of Wyrm}} |
||
In its final Head-to-Head battle, Ironside3 faced Supernova - a robot which it needed to beat to ensure its place in the Heat Final. |
In its final Head-to-Head battle, Ironside3 faced Supernova - a robot which it needed to beat to ensure its place in the Heat Final. |
||
{{Dialogue a-b|Dara Ó Briain|Are you confident? Because you seem slightly nervous at the moment.|Louise Hemstock|We're alright - we're just thinking everything through, and we'll have a look when we move up to the arrows, see how everybody is looking and go from there.|Team Outlaw keep their cards close to their chest before the crucial Head-to-Head battle between Ironside3 and Supernova}} |
{{Dialogue a-b|Dara Ó Briain|Are you confident? Because you seem slightly nervous at the moment.|Louise Hemstock|We're alright - we're just thinking everything through, and we'll have a look when we move up to the arrows, see how everybody is looking and go from there.|Team Outlaw keep their cards close to their chest before the crucial Head-to-Head battle between Ironside3 and Supernova}} |
||
| − | [[File:Supernova Ironside3.jpg|thumb|Ironside3 connects with a damaging first hit]] |
+ | [[File:Supernova Ironside3.jpg|thumb|left|Ironside3 connects with a damaging first hit]] |
Ironside3 quickly got its spinning bar up to speed and connected with a damaging first blow to Supernova, which left it with limited mobility. With Supernova unable to defend itself, Ironside3 targeted its wheels, and a barrage of attacks left Supernova immobilised on the edge of Shunt's CPZ. Supernova was then counted out and cease was called, confirming Ironside3's victory and securing its place in the Heat Final against Pulsar. |
Ironside3 quickly got its spinning bar up to speed and connected with a damaging first blow to Supernova, which left it with limited mobility. With Supernova unable to defend itself, Ironside3 targeted its wheels, and a barrage of attacks left Supernova immobilised on the edge of Shunt's CPZ. Supernova was then counted out and cease was called, confirming Ironside3's victory and securing its place in the Heat Final against Pulsar. |
||
| − | [[File:Ironside3 damage.jpg|thumb |
+ | [[File:Ironside3 damage.jpg|thumb|Ironside3 is inspected for damage after defeating Supernova]] |
{{quote|We've had some brutal fights and she's showing it! The belt's actually turned around. The pulley's that damaged we can't repair it here - we need a lathe. So we just have to go in and fight the good fight.|Adam Lewis before the Heat Final}} |
{{quote|We've had some brutal fights and she's showing it! The belt's actually turned around. The pulley's that damaged we can't repair it here - we need a lathe. So we just have to go in and fight the good fight.|Adam Lewis before the Heat Final}} |
||
| − | [[File:Ironside3 vs Pulsar.jpg|thumb|Ironside3 slams Pulsar into submission]] |
+ | [[File:Ironside3 vs Pulsar.jpg|thumb|left|Ironside3 slams Pulsar into submission]] |
Ironside3 connected with the first blow, although it caused little trouble for Pulsar. Ironside3 moved away and got its bar up to speed again, before striking a hit to the left side of Pulsar. |
Ironside3 connected with the first blow, although it caused little trouble for Pulsar. Ironside3 moved away and got its bar up to speed again, before striking a hit to the left side of Pulsar. |
||
{{quote|Big hit from Ironside3. That may well have stilled the beating heart within the Pulsar.|Jonathan Pearce}} |
{{quote|Big hit from Ironside3. That may well have stilled the beating heart within the Pulsar.|Jonathan Pearce}} |
||
| − | [[File:Ironside3 vs Pulsar S9.jpg|thumb |
+ | [[File:Ironside3 vs Pulsar S9.jpg|thumb|Ironside3 continues to punish the beaten Pulsar]] |
This hit left Pulsar unable to move, and it was counted out after a final barrage of blows from Ironside3. This meant that Ironside3 had won the Heat Final, and progressed to the Grand Final as the winner of [[Robot Wars: Series 9/Heat 4|Heat 4]]. |
This hit left Pulsar unable to move, and it was counted out after a final barrage of blows from Ironside3. This meant that Ironside3 had won the Heat Final, and progressed to the Grand Final as the winner of [[Robot Wars: Series 9/Heat 4|Heat 4]]. |
||
{{quote|I genuinely think we're probably the only two left standing out of all of it, and I'm just so happy to be at the top.|Adam Lewis to Angela Scanlon after Ironside3's victorious Heat Final battle}} |
{{quote|I genuinely think we're probably the only two left standing out of all of it, and I'm just so happy to be at the top.|Adam Lewis to Angela Scanlon after Ironside3's victorious Heat Final battle}} |
||
In its Grand Final Group Battle, Ironside3 faced newcomers [[Concussion]] and the [[Robot Wars: Series 8|Series 8]] runner-up [[Carbide]]. |
In its Grand Final Group Battle, Ironside3 faced newcomers [[Concussion]] and the [[Robot Wars: Series 8|Series 8]] runner-up [[Carbide]]. |
||
| − | [[File:Carbide vs Ironside3 selfrighter.png|thumb|Ironside3's srimech is damaged by Carbide]] |
+ | [[File:Carbide vs Ironside3 selfrighter.png|thumb|left|Ironside3's srimech is damaged by Carbide]] |
In order to get its bar up to speed, Ironside3 hung around near its starting position in the opening seconds, while Carbide caused key damage to Concussion straight away. Ironside3 then went towards Concussion itself, but crossed paths with Carbide in doing so, and in trying to avoid Carbide, Ironside3 suffered severe damage to its srimech. Ironside3 then engaged with Concussion with a short rally of glancing blows. |
In order to get its bar up to speed, Ironside3 hung around near its starting position in the opening seconds, while Carbide caused key damage to Concussion straight away. Ironside3 then went towards Concussion itself, but crossed paths with Carbide in doing so, and in trying to avoid Carbide, Ironside3 suffered severe damage to its srimech. Ironside3 then engaged with Concussion with a short rally of glancing blows. |
||
{{quote|Concussion in trouble here, and the other teams are moving in for the kill.|Jonathan Pearce}} |
{{quote|Concussion in trouble here, and the other teams are moving in for the kill.|Jonathan Pearce}} |
||
| − | [[File:Ironside3 vs Concussion.png|thumb |
+ | [[File:Ironside3 vs Concussion.png|thumb|Ironside3 and Carbide surround the limping Concussion]] |
Ironside3 moved away into space again, before both Ironside3 and Carbide surrounded Concussion at the same time, where both machines took their turn at dishing out further damage. A final blow from Carbide crashed Concussion towards the Arena Tyre, which then deflected it into [[Shunt|Shunt's]] CPZ. In the countdown time for Concussion's immobility, Ironside3 and Carbide squared off without engaging with each other, before cease was called. |
Ironside3 moved away into space again, before both Ironside3 and Carbide surrounded Concussion at the same time, where both machines took their turn at dishing out further damage. A final blow from Carbide crashed Concussion towards the Arena Tyre, which then deflected it into [[Shunt|Shunt's]] CPZ. In the countdown time for Concussion's immobility, Ironside3 and Carbide squared off without engaging with each other, before cease was called. |
||
{{dialogue a-b|Angela Scanlon|Ironside, I felt like that you guys just hung back and said we'll just sit this out.|Adam Lewis|We got involved a little bit! We gave a few tickles out!|Ironside3's less explosive role in the demise of Concussion is brought up post battle}} |
{{dialogue a-b|Angela Scanlon|Ironside, I felt like that you guys just hung back and said we'll just sit this out.|Adam Lewis|We got involved a little bit! We gave a few tickles out!|Ironside3's less explosive role in the demise of Concussion is brought up post battle}} |
||
In the pits afterwards, Team Outlaw inspected the damage suffered by Carbide, and the self-righting mechanism was found to be beyond repair, which put it in a handicapped position for its first Head-to-Head against the full-pressure flipper, [[Eruption]]. |
In the pits afterwards, Team Outlaw inspected the damage suffered by Carbide, and the self-righting mechanism was found to be beyond repair, which put it in a handicapped position for its first Head-to-Head against the full-pressure flipper, [[Eruption]]. |
||
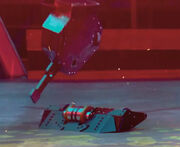
| − | [[File:Eruption vs Ironside3.jpg|thumb|Ironside3 is thrown through the air]] |
+ | [[File:Eruption vs Ironside3.jpg|thumb|left|Ironside3 is thrown through the air]] |
With no srimech, Ironside3 ran away from the pursuing Eruption and got its bar up to speed. Ironside3 then turned into Eruption and caught the middle of its flipper with a hit. Eruption then quickly slipped underneath Ironside3 and attempted to throw it over, but Ironside3 managed to land just outside of the reach of Eruption's flipper. After throwing itself over with its mistimed flip, Eruption self-righted and then came onto the attack - this time connecting with a clean flip which threw Ironside3 through the air, although Ironside3 landed on its wheels. |
With no srimech, Ironside3 ran away from the pursuing Eruption and got its bar up to speed. Ironside3 then turned into Eruption and caught the middle of its flipper with a hit. Eruption then quickly slipped underneath Ironside3 and attempted to throw it over, but Ironside3 managed to land just outside of the reach of Eruption's flipper. After throwing itself over with its mistimed flip, Eruption self-righted and then came onto the attack - this time connecting with a clean flip which threw Ironside3 through the air, although Ironside3 landed on its wheels. |
||
{{quote|Oh! Mighty flip from Eruption! We've seen that throughout this series of Robot Wars, and Ironside3 now tactically running away.|Jonathan Pearce}} |
{{quote|Oh! Mighty flip from Eruption! We've seen that throughout this series of Robot Wars, and Ironside3 now tactically running away.|Jonathan Pearce}} |
||
| − | [[File:Ironside 3 over and out.jpg|thumb |
+ | [[File:Ironside 3 over and out.jpg|thumb|Ironside3 is overturned]] |
Ironside3 was forced onto the back foot again by the charging Eruption, and after failing to turn quickly enough inside a CPZ, Ironside3 was caught by Eruption, and was bundled over. Unable to right itself, Ironside3 was counted out, and Team Outlaw's first Head-to-Head battle in the Grand Final ended in defeat. |
Ironside3 was forced onto the back foot again by the charging Eruption, and after failing to turn quickly enough inside a CPZ, Ironside3 was caught by Eruption, and was bundled over. Unable to right itself, Ironside3 was counted out, and Team Outlaw's first Head-to-Head battle in the Grand Final ended in defeat. |
||
{{quote|We're dead, we're dead. Game over.|Trevor Wright}} |
{{quote|We're dead, we're dead. Game over.|Trevor Wright}} |
||
In its second Head-to-Head battle, Ironside3 faced the severely patched up [[Aftershock]] after it was torn apart by [[Carbide]] in its previous battle. The pressure was also on for Team Outlaw, as a defeat would end any chances of Ironside3 appearing in the Grand Final championship battle. |
In its second Head-to-Head battle, Ironside3 faced the severely patched up [[Aftershock]] after it was torn apart by [[Carbide]] in its previous battle. The pressure was also on for Team Outlaw, as a defeat would end any chances of Ironside3 appearing in the Grand Final championship battle. |
||
| − | [[File:Aftershock vs ironside 3.jpg|thumb|Ironside3 crashes into Aftershock]] |
+ | [[File:Aftershock vs ironside 3.jpg|thumb|left|Ironside3 crashes into Aftershock]] |
Once again, Ironside3 was forced into an early retreat as Aftershock got its weapon up to speed the quicker out of the two. Ironside3 then turned around and the meeting of the two machines saw Aftershock sustain significant bodywork damage as well as sending Ironside3 up, off the arena floor. Aftershock responded quickly, and sent Ironside3 cartwheeling through the air. Ironside3 landed safely on its wheels, while Aftershock was stunned for a short period as its weapon motor came under a shower of sparks. Ironside3 hung in the middle of the arena and then met the charging Aftershock, which was now weaponless. Another collision between the two sent more shards flying from Aftershock. |
Once again, Ironside3 was forced into an early retreat as Aftershock got its weapon up to speed the quicker out of the two. Ironside3 then turned around and the meeting of the two machines saw Aftershock sustain significant bodywork damage as well as sending Ironside3 up, off the arena floor. Aftershock responded quickly, and sent Ironside3 cartwheeling through the air. Ironside3 landed safely on its wheels, while Aftershock was stunned for a short period as its weapon motor came under a shower of sparks. Ironside3 hung in the middle of the arena and then met the charging Aftershock, which was now weaponless. Another collision between the two sent more shards flying from Aftershock. |
||
{{quote|Good battle, this!|Jonathan Pearce}} |
{{quote|Good battle, this!|Jonathan Pearce}} |
||
| − | [[File:Aftershock flipped by spike.jpg|thumb |
+ | [[File:Aftershock flipped by spike.jpg|thumb|Aftershock is knocked out by an Arena Spike]] |
Ironside3's weapon then came to a stop and it moved away to get it working again. Ironside3 met Aftershock side on and knocked it over the Arena Spikes, which promptly shot up and sent Aftershock over. With its weapon not working, Aftershock was unable to self-right, and a victorious Ironside3 celebrated in the centre of the arena. |
Ironside3's weapon then came to a stop and it moved away to get it working again. Ironside3 met Aftershock side on and knocked it over the Arena Spikes, which promptly shot up and sent Aftershock over. With its weapon not working, Aftershock was unable to self-right, and a victorious Ironside3 celebrated in the centre of the arena. |
||
{{quote|Now we really need them to do us a favour and have a good go at Eruption.|Adam Lewis explains why Ironside3 didn't go in for the kill after Aftershock was thrown over}} |
{{quote|Now we really need them to do us a favour and have a good go at Eruption.|Adam Lewis explains why Ironside3 didn't go in for the kill after Aftershock was thrown over}} |
||
| Line 139: | Line 145: | ||
Ironside3 was quickly backed next to the arena wall, buckling the wall slightly as Carbide closed in while Ironside3 spun its weapon up to speed. Both machines then traded hits with their bars before Ironside3's weapon smacked against the arena side gate panel. Ironside3 then charged away into space before turning its bar towards Carbide, but contact between the two knocked Ironside3 onto the Floor Flipper, where it was lifted off its wheels. Carbide then came in with a rally of hits before Ironside3 retreated again. Ironside3 turned around once more, and this time dealt a clean hit to upper region of Carbide. Carbide reasserted itself with a hit to the back corner of Ironside3, and after this, Ironside3's weapon stopped working. |
Ironside3 was quickly backed next to the arena wall, buckling the wall slightly as Carbide closed in while Ironside3 spun its weapon up to speed. Both machines then traded hits with their bars before Ironside3's weapon smacked against the arena side gate panel. Ironside3 then charged away into space before turning its bar towards Carbide, but contact between the two knocked Ironside3 onto the Floor Flipper, where it was lifted off its wheels. Carbide then came in with a rally of hits before Ironside3 retreated again. Ironside3 turned around once more, and this time dealt a clean hit to upper region of Carbide. Carbide reasserted itself with a hit to the back corner of Ironside3, and after this, Ironside3's weapon stopped working. |
||
{{quote|Ironside3 worn down into submission - the weaponry has stopped.|Jonathan Pearce}} |
{{quote|Ironside3 worn down into submission - the weaponry has stopped.|Jonathan Pearce}} |
||
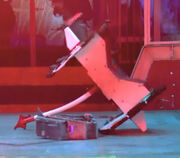
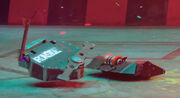
| − | [[File:Carbide KOs ironside 3.jpg|thumb|Ironside3 is immobilised in a shower of sparks]] |
+ | [[File:Carbide KOs ironside 3.jpg|thumb|left|Ironside3 is immobilised in a shower of sparks]] |
| − | Ironside3 was then thrashed into [[Shunt|Shunt's]] CPZ, where it was axed as it attempted to escape. After moving away from Shunt's territory, Ironside3 was met with one final hit from Carbide which rendered Ironside3 immobile. |
+ | Ironside3 was then thrashed into [[Shunt|Shunt's]] CPZ, where it was axed as it attempted to escape. After moving away from Shunt's territory, Ironside3 was met with one final hit from Carbide which rendered Ironside3 immobile. Outside of the televised broadcast, the immobile Ironside3 was pushed into the pit by Shunt<ref>https://youtu.be/lw2RFrrVKIU</ref>, concluding its battle in resounding defeat. |
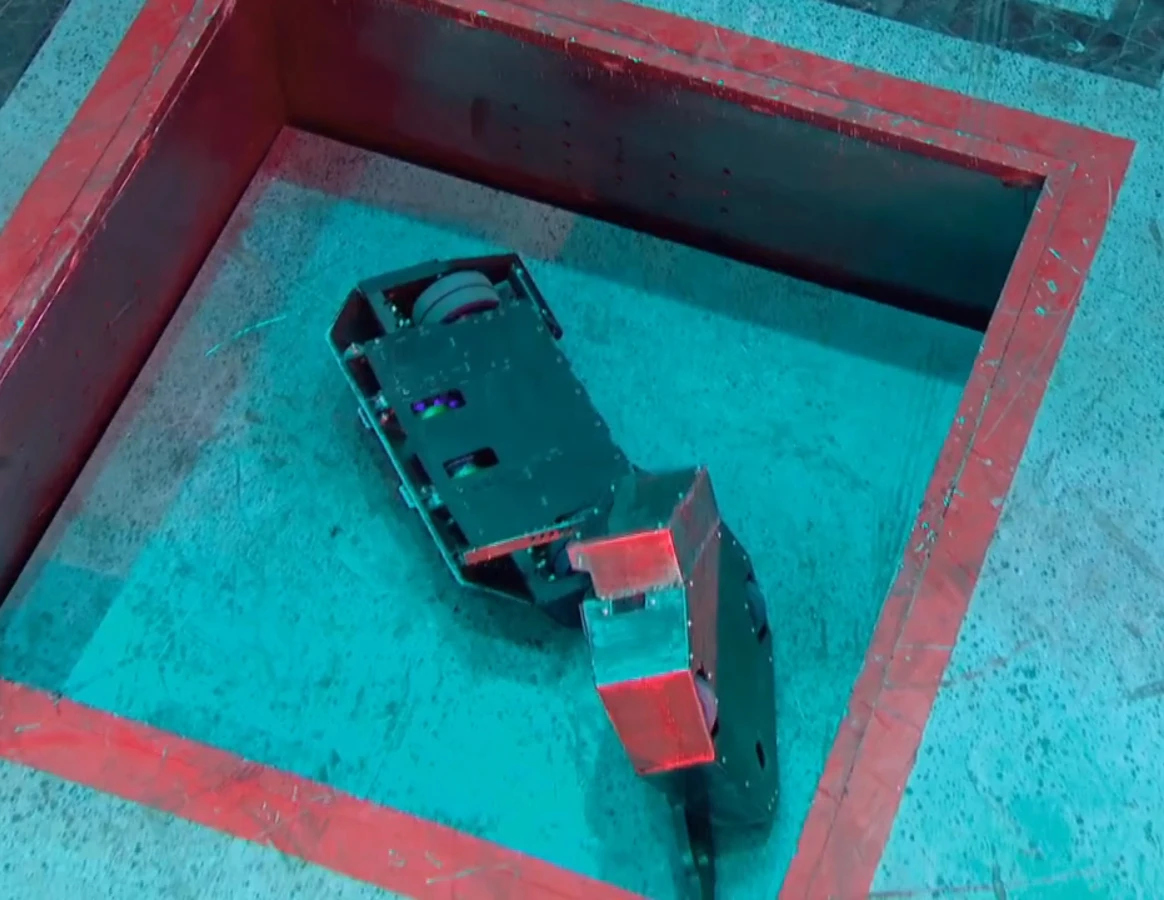
| + | [[File:Ironside3 aftermath.jpg|thumb|The split chassis of Ironside3 after its final defeat]] |
||
| − | With Ironside3's final Head-to-Head battle ending in |
+ | With Ironside3's final Head-to-Head battle ending in a loss, it now needed Aftershock to defeat Eruption by a knockout to send the remaining machines to a three-way points tie, where the judges would then decide which robot would fight Carbide in the final. Unfortunately for Ironside3, Eruption edged out Aftershock, which meant that its total of six points was enough to face Carbide for a second time. As a result, on a total of three points, Ironside3 finished third in Series 9 of ''Robot Wars''. |
==Results== |
==Results== |
||
| Line 171: | Line 178: | ||
==Series Record== |
==Series Record== |
||
| + | <gallery type="slideshow"> |
||
| − | + | Ironside gateway.jpg|Team Outlaw enter the arena in Series 8 |
|
| + | Ironside3 VT.jpg|An unfinished Ironside3 with its unused heavier bar |
||
| + | </gallery> |
||
{{Series Record EX|Ironside3|Did not enter|Did not enter|Robotic Soccer with [[Velocirippa#Series 3|Velocirippa]]|Entered with [[Velocirippa#Series 4|Velocirippa]]|Entered with [[Velocirippa#Series 5|Velocirippa]]|Entered with [[Mighty Mouse]]<br>Withdrew [[Velocirippa]]|Entered with [[Mighty Mouse]]<br>Entered with [[Velocirippa]]|'''Heat Round 2, Third Place'''|'''Grand Final, Third Place'''|''Not selected with [[Ironside3#Qualification|unspecified robot]]''|Entered with [[Velocirippa]]|Entered with [[Mighty Mouse]] and [[Velocirippa]]}} |
{{Series Record EX|Ironside3|Did not enter|Did not enter|Robotic Soccer with [[Velocirippa#Series 3|Velocirippa]]|Entered with [[Velocirippa#Series 4|Velocirippa]]|Entered with [[Velocirippa#Series 5|Velocirippa]]|Entered with [[Mighty Mouse]]<br>Withdrew [[Velocirippa]]|Entered with [[Mighty Mouse]]<br>Entered with [[Velocirippa]]|'''Heat Round 2, Third Place'''|'''Grand Final, Third Place'''|''Not selected with [[Ironside3#Qualification|unspecified robot]]''|Entered with [[Velocirippa]]|Entered with [[Mighty Mouse]] and [[Velocirippa]]}} |
||
| − | ''NOTE: Trevor Wright's machine, [[Meggamouse]], was also entered into Series 9 by |
+ | ''NOTE: Trevor Wright's machine, [[Meggamouse]], was also entered into Series 9 by [[Team Tilly]], also applying for Series 10 without being selected'' |
==Outside Robot Wars== |
==Outside Robot Wars== |
||
<gallery type="slideshow"> |
<gallery type="slideshow"> |
||
Ironside.gif|The original Ironside |
Ironside.gif|The original Ironside |
||
| + | Ironside1.png|Ironside under Team Tilly |
||
Ironside_2.jpg|Ironside 2 under construction, armed with a disc |
Ironside_2.jpg|Ironside 2 under construction, armed with a disc |
||
| − | Ironside_2_bar.png|Ironside 2 armed with a bar at the 2014 UK |
+ | Ironside_2_bar.png|Ironside 2 armed with a bar at the 2014 UK Featherweight Championship |
| + | Ironside2.jpg|The final version of Ironside 2 |
||
| + | Ironside2 Internals.jpg|The internals of Ironside 2 |
||
</gallery> |
</gallery> |
||
| − | + | Ironside3 did not compete outside of ''Robot Wars'', only appearing as a static display at ''Robots Live!'' and local motoring events. However, its featherweight predecessor '''Ironside''' fought exclusively at live events, and was later sold to [[Team Tilly]] who restored the machine to working condition in May 2020. The second version, Ironside 2, was built in 2012 and later competed in the UK Featherweight Championship in 2014, where its spinning disc was swapped for a spinning bar, also returning for the 2016 championship. Ironside 2 was gradually updated over time until it heavily resembled its successor, where it became used as a test bed for Ironside3. |
|
| + | |||
| + | Team Outlaw most commonly participated in live heavyweight combat with '''YOTON''' (Adam Lewis and Louise Hemstock) and [[Meggamouse]] (Trevor Wright). For more information, see the [[Team Outlaw]] page. |
||
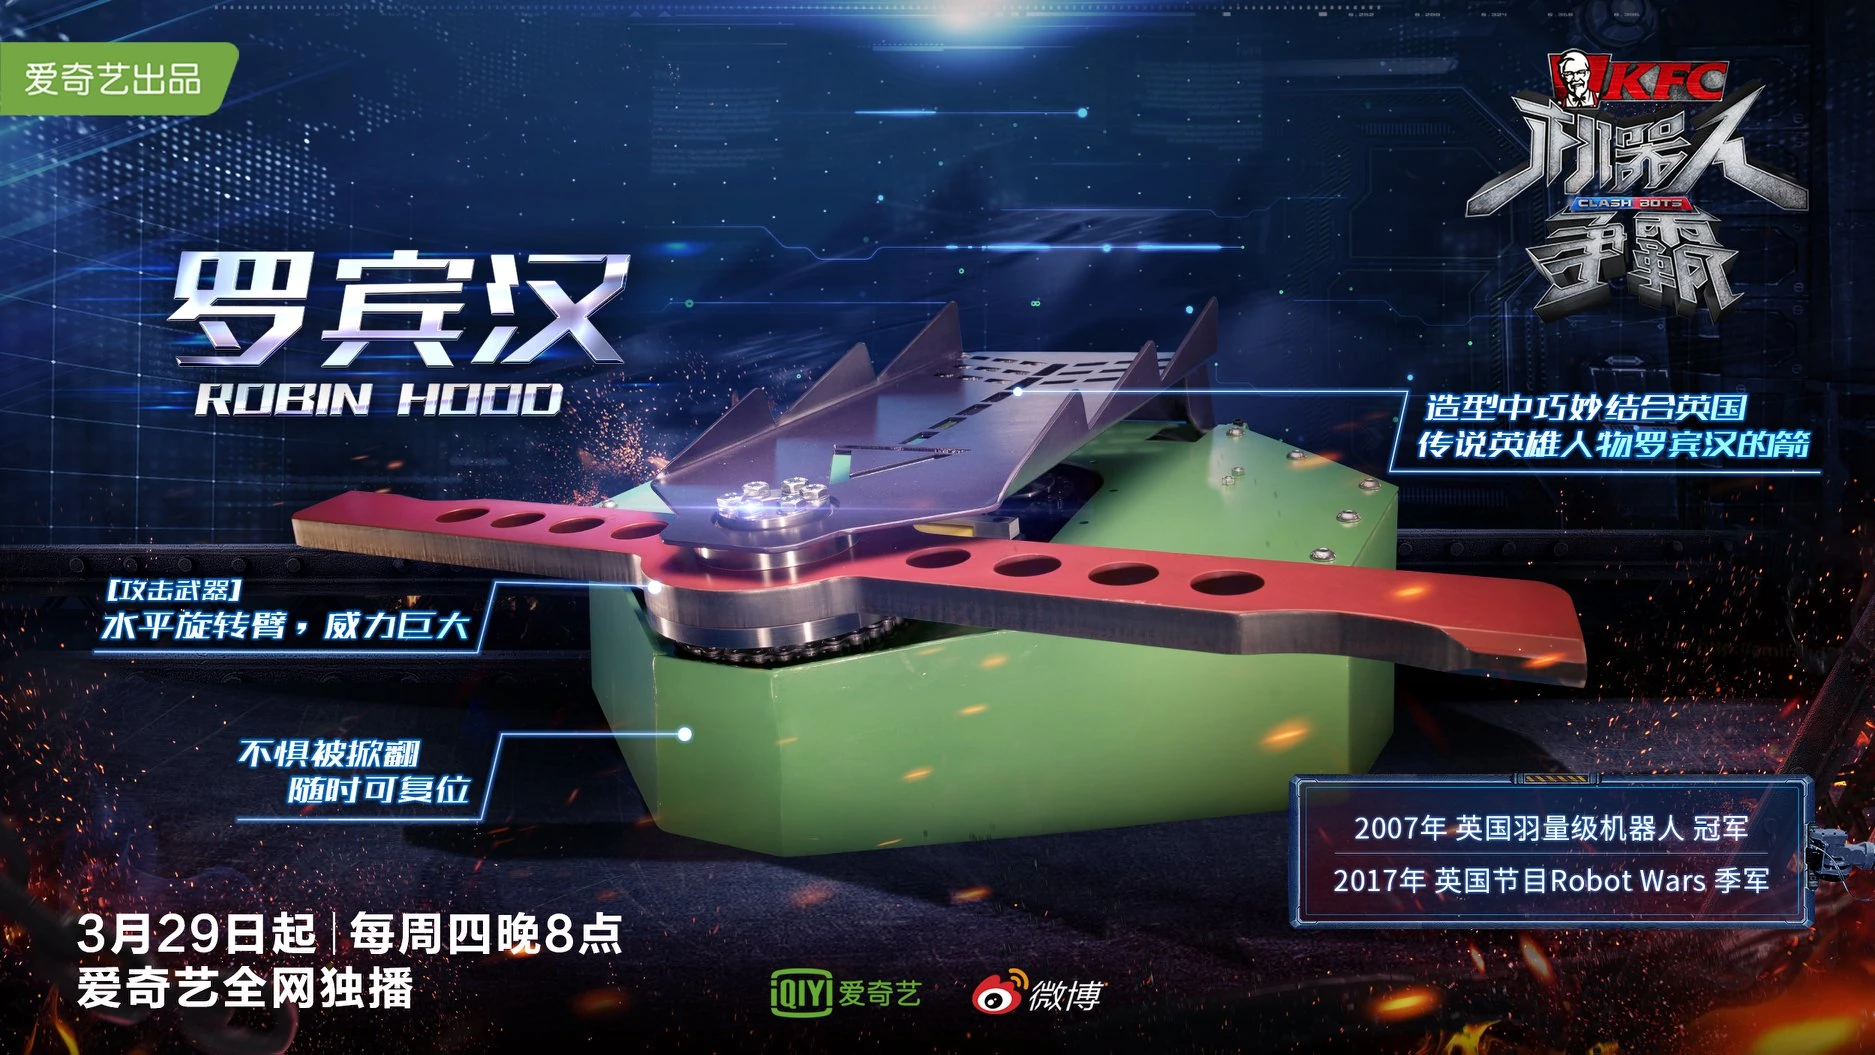
[[File:Robin Hood.jpg|thumb|left|Robin Hood at ''Clash Bots'']] |
[[File:Robin Hood.jpg|thumb|left|Robin Hood at ''Clash Bots'']] |
||
In early 2018, Team Outlaw competed in the Chinese TV show ''Clash Bots'', with a robot remarkably similar to Ironside3, named '''Robin Hood'''. It uses the same core design as Ironside3, but with a new self-righting mechanism, and a green colour-scheme to reflect its namesake. However, it suffered an early first-round loss to '''Nightmare Strangler''', delivering only two hits before Robin Hood suddenly lost all power, and was eliminated from the competition. |
In early 2018, Team Outlaw competed in the Chinese TV show ''Clash Bots'', with a robot remarkably similar to Ironside3, named '''Robin Hood'''. It uses the same core design as Ironside3, but with a new self-righting mechanism, and a green colour-scheme to reflect its namesake. However, it suffered an early first-round loss to '''Nightmare Strangler''', delivering only two hits before Robin Hood suddenly lost all power, and was eliminated from the competition. |
||
| + | |||
| + | Team Outlaw were also revealed to be competing in the 2020 season of ''BattleBots'' with '''Spitfire''', again an advancement of the design pioneered by Ironside3. The robot is in a relatively complete state and intends to compete in the TV season when possible. |
||
==Trivia== |
==Trivia== |
||
Revision as of 18:16, 1 June 2020
- "Ironside 3 has the longest and heaviest spinning bar weapon in the competition – one metre long and weighing 35kg (about a third of its whole weight). The bar spins at 1,500rpm – which is three times the speed of a helicopter’s blade (an average of 460 rpm)."
- — The Robot Wars Website
Ironside3 (spelt on the TV show as Ironside 3, or Ironside-3 on the website) was a heavyweight robot from Team Outlaw which competed in Series 8 and Series 9 of Robot Wars. In its first appearance during Series 8, Ironside3 reached the Head-to-Head stage in its heat and defeated Beast and Gabriel there, but a loss to Pulsar meant it was unable to score enough points for a place in the Heat Final.
Ironside3 returned for Series 9 and reached the Grand Final after avenging its previous loss to Pulsar in its Heat Final victory. Although it lost to Carbide, it was the only robot in Series 9 to land a successful attack on the eventual champion. Ironside3 managed to defeat Aftershock during the head-to-heads and placed third in the UK Championship.
Although Ironside3 is the third member of the Ironside series of robots, it was the first heavyweight. The original Ironside was an octagonal, two-wheeled featherweight, while Ironside 2, also a featherweight, was originally armed with a spinning disc, before the weaponry was adapted to become a spinning bar, like the weapon of Ironside3.
Design
Ironside3 in Series 8
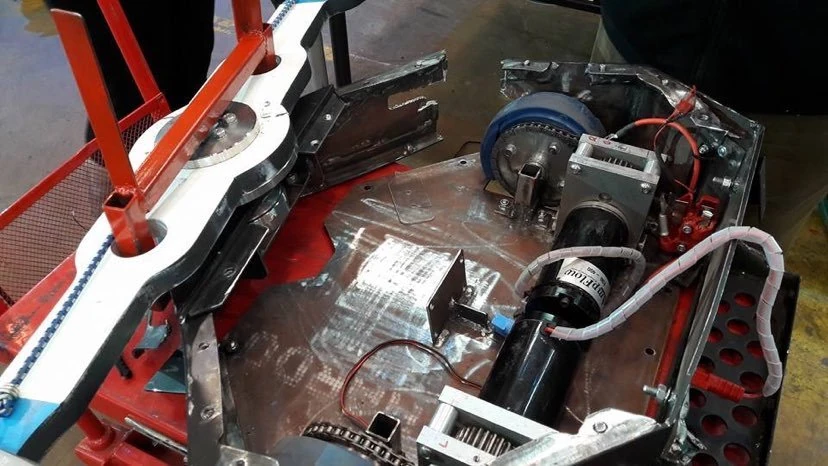
Ironside3 was two-wheel driven, and somewhat curved in shape. It was armed with a one-metre diameter, 18kg spinning bar, which spins at 1500rpm for devastating damage. The bar was initially planned to weigh 35kg, and was quoted as such on the official website, but this was not possible due to weight restrictions, and the lighter 18kg bar was created as a result. The original 35kg bar can still be seen in Ironside3's VT for Series 8. Besides its spinning bar, Ironside3 also featured a srimech bar, lifting the robot sideways, similar to the srimechs of Hypno-Disc and 13 Black, although with a more triangular shape. However, the srimech was extremely slow in Series 8, and failed to right the robot in its only opportunity. The robot was made from 5mm HARDOX steel, and in Series 8 was unpainted, keeping the traditional 'HARDOX brown', with the robot's name painted on top. Ironside3 entered its first battle completely untested.
- "Nothing can damage us, we're worried about the mechanism falling apart when we hit something!"
- — Trevor Wright
Ironside3's turntable shot in Series 9

Official image of Ironside3 in Series 9
Ironside3 returned for Series 9 with a new motor which allows the weapon to spin up much faster. Two blades could be used interchangeably; a flat blade and a 'cutting-edge' blade. The self-righting mechanism was powered by a 900 motor, coupled to a Banebots gearbox and a brass worm gear. It was four times faster than the Series 8 model and capable of fully self righting in five seconds, producing much more torque in the process. Ironside3 features a vertical beam on its right-hand side so it always lands in an optimal position to self-right. The robot was now painted black with white and blue spinning bars - the latter serving as a homage to the RAF - with spikes fixed to the front directly under the bar.
The Team
- Main article: Team Outlaw

Ironside3 with Team Outlaw in Series 8
Ironside3 with Team Outlaw in Series 9
Ironside3 was entered into Robot Wars by Team Outlaw, a Nottingham-based team captained by 61-year old Trevor Wright, a roboteer with previous experience on the show after entering Robot Wars with Velocirippa and Mighty Mouse. Trevor Wright created the CAD for Ironside3 and machined its parts, while 29-year old Adam Lewis was the lead builder, who drove the robot in combat, and was responsible for wiring. Trevor Wright's wife Patricia, and Adam Lewis' partner Louise Hemstock, completed the team in both series.
Qualification

Ironside3 in its Series 8 VT, fitted with the planned 35kg bar spinner which could not be used
With Series 8 being filmed only weeks after applications closed, Ironside3 first had to be built within the time-frame of one month in order for it to compete in the series, having been accepted to compete. A largely similar Ironside3 was also accepted for Series 9, while Trevor Wright's Meggamouse would later join the selection of competitors as a reserve.
For Series 10, Team Outlaw begun working on a brand-new robot with a bar spinner, designed to fix the flaws the team experienced with Ironside3. Only the drive gearboxes, motors and wheels were reused from Ironside3, with every other component being new. However, despite Ironside3's third place finish in Series 9, it was the decision of the producers that the new robot would not compete in Series 10[1].
Robot History
Series 8
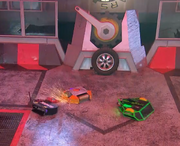
Ironside3 appeared in Heat 5 where it faced Chompalot and Pulsar in its first round melee, as well as Thermidor 2, the third time that Trevor Wright fought Team Lobster.

Thermidor 2 backs into Ironside3's spinning bar
Ironside3 rips a panel from Chompalot
Ironside3 was dominant in the battle, getting its spinner up to speed, and immobilising Thermidor 2 in a single blow, quickly avenging the Heat Final loss by Mighty Mouse to the lobster. Ironside3 also struck the back of Pulsar with its bar, also immobilising another robot on one side. Ironside3 turned its efforts to the only fully mobile robot, Chompalot, ripping a panel from the side of it and bending its chassis. The pit release button was pressed by Ironside3, which kept its distance until cease was called. Ironside3 was put through to the next round, alongside Chompalot.
Ironside3 first fought Beast in the head-to-head stage, having tightened the drive belt for its spinning bar to allow for an even faster spin-up.
Ironside3 takes out Beast's tyre
Ironside3 deflects off the immobile Beast
Ironside3 had a relatively easy time in the battle, fleeing from Beast in order to spin up its weapon, before immobilising Beast on one side within three blows. It then landed an accurate blow to Beast's mobile tyre, fully immobilising the machine. Ironside3 landed two more blows, and then celebrated its win by spinning on the spot.
In its next Head-to-Head, Ironside3 fought Gabriel. Team Outlaw talked to Professor Noel Sharkey about how to deal with such an awkward design, which had applied a battleaxe in order to jam the spinning bar of Ironside3.
- "We're not sure what the wheels are made of, in which case, we're not sure whether we'll go straight through it, or if we'll crack it!"
- — Adam Lewis

Ironside3 slams into Gabriel
After gaining full speed on its weapon, Ironside3 launched a series of attacks onto Gabriel, removing tyre tread from its wheels, and throwing it into Sir Killalot. Ironside3's next attack bent the pole on which Gabriel's battleaxe was positioned, and another blow caused recoil damage.
- "That mighty, destructive power of Ironside3's spinning bar doesn't seem to be causing that much trouble, because of the... the wobbliness of Gabriel!"
- — Jonathan Pearce

The bar spinner throws Gabriel
Ironside3 inflicts further damage
Ironside3 caused more damage to Gabriel's wheels, and threw it over, back into Sir Killalot. Ironside3 launched Gabriel through the air, and onto the flame pit, having broken one of its torque limiters over the course of the battle, meaning Gabriel could not attack in retaliation. After three final blows, cease was called. Ironside3 won the resulting Judges' decision unanimously, but was awarded only 2 points as it had failed to score a knockout.
- "That looked like it went pretty seamlessly for you guys!"
- — Angela Scanlon
Ironside3 went into its match against the reinstated Pulsar with five points, second to Gabriel's 6 points, meaning a victory would be necessary for Ironside3 to progress.

The spinners collide, Ironside3 comes off worse

Ironside3 is gripped by Sir Killalot
The two spinners collided in the centre of the arena, and Ironside3 was thrown over by Pulsar's drum. Ironside3's srimech was extremely slow in activation, and Pulsar damaged the top of Ironside3, and pushed it into Sir Killalot. Ironside3's srimech was fully extended when it was grabbed by Sir Killalot, which ironically dropped Ironside3 back onto its wheels. Ironside3 had lost the removable link that powered its weapon, but still seemingly had the advantage, as Pulsar had stopped moving on one side when both competitors collided. Ironside3 pushed a now completely immobile Pulsar into the pit, but drove itself down in the process.
- "Slowly, slowly, inch by inch, oh they've taken themselves out!"
- — Jonathan Pearce on Ironside3's bad driving

The battle continues after Ironside3 is righted
Both robots are pitted
The Judges were called upon to make a decision, and they ruled that because Ironside3 had been immobile for over ten seconds towards the beginning of the fight, the victory would be awarded to Pulsar via knockout. This meant that Ironside3 did not have enough points to progress to the Heat Final.
- "They didn't really give us a fair chance to actually self-right... we happened to land on our wheels, and nobody called cease, so we carried on, but that's the way it goes, I suppose!"
- — Trevor Wright
Series 9
- "They're back with an upgraded robot and a steely resolve to win."
- — Angela Scanlon introduces Ironside3 before its Group Battle
Ironside3 competed in Heat 4, with a Group Battle which saw it face Pulsar once again, as well as another spinner, Apex, and the experienced Crushtacean.

Ironside3 connects with a killer blow to Crushtacean
Ironside3 moved away into space early on to gets its bar up to speed, before landing a blow on Crushtacean which ripped a chunk of its armour away and left it immobilised on the Flame Pit. Ironside3 was then rammed by Pulsar, which followed through with a charge after immobilising Apex. With Crushtacean and Apex immobilised, Ironside3 spun around in a victory dance, and its progression through to the Head-to-Heads with Pulsar was soon confirmed, as cease was called on the battle.
- "Hugely impressive, Ironside3 - very, very good."
- — Jonathan Pearce
Ironside3 was safely through, but it had sustained damage from Pulsar during the Group Battle, as its bar spinner was clashing with the robot's surface, which needed to be repaired. Ironside3's first Head-to-Head battle was also against Pulsar - with Trevor Wright wary of his opponent after Ironside3's defeat to Team Ranglebots' machine in the last series.
- "I'm not quite sure how we're going to approach this one. Probably very slowly, very gingerly, very measured."
- — Trevor Wright before Ironside3's first Head-to-Head battle against Pulsar

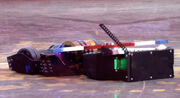
Ironside3 recoils away from Pulsar
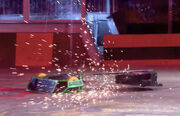
Ironside3 immediately found itself under pressure from Shunt as it moved into the House Robot's CPZ while trying to get its weapon up to speed. Ironside3 continued its shaky start as it missed Pulsar's side with a drive and followed through onto the Floor Flipper, where it was thrown up into the air. Ironside3 landed back on its wheels but was quickly under pressure again as Pulsar came in with a ram that slammed Ironside3 into the Arena Tyre and descended the Pit. Ironside3 was then thrown into Sir Killalot's CPZ after a head to head blow, and Pulsar - with its drum deliberately stopped to prevent overheating - halted Ironside3's bar with another drive.
- "Good tussle, this. Very good tussle."
- — Jonathan Pearce
Pulsar and Ironside3 lock horns
Ironside3 continued to retreat from the aggressive Pulsar and was thrown by the Floor Flipper for a second time, and Ironside3's weapon then came to a stop. Pulsar moved perilously close to the Pit as the battle developed into a pushing match, before Pulsar lost drive on one side. Pulsar was forced to self-right after being dropped onto its back by Sir Killalot, while Ironside3's bar had started to spin again, and it used its weapon to strike Pulsar. Ironside3 started to spin around in victory as Pulsar spun up its weapon again in order to use the gyroscopic effect to help give Pulsar better mobility. Louise Hemstock then noticed that the countdown timer had started in their booth, and instructed Adam Lewis to display Ironside3's mobility while Pulsar was being counted out.
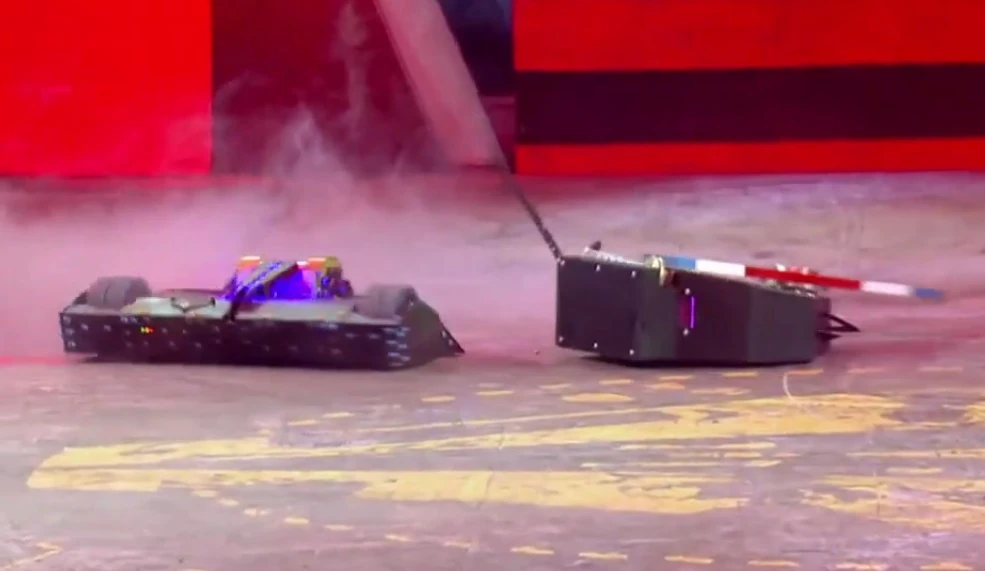

Both robots move dangerously close to the Pit of Oblivion
- "Now, there seems to be confusion here. Ironside3 think Pulsar's has been counted out but Pulsar is still mobile. Cease has not been called - the fight is still on."
- — Jonathan Pearce
Unbeknown to Team Outlaw, the judges had cancelled their timer after Pulsar displayed enough activity to count it as mobile, but the abandonment of the countdown was not translated to the Ironside3 booth, which lead them to believe that Pulsar was counted out. Because of this, Ironside3 did not attack Pulsar in the remaining time in the battle, and the battle went to a Judges' decision.
- "Passions will rise high either side for this Judges' decision - I would not like to be in their shoes."
- — Jonathan Pearce
Not shown on television, the judges unanimously decided that Pulsar had won the battle, earning it two points. However, at this point Team Outlaw revealed the technical fault of their countdown timer, information which was passed onto the Judges, who offered a compromise which saw both robots awarded two points each, with no official victor, a compromise which Team Outlaw were satisfied with.


Noel Sharkey explains the final decision to Team Outlaw
- "I pressed the button and it cancelled on our screen - the countdown. But I've been up there and you got [sic] countdown continued. So, it wasn't fair, so what we're going to do is we're going to award both teams two points."
- — Noel Sharkey explains the judges' ruling to Trevor Wright and Adam Lewis
Ironside3's second Head-to-Head was against Wyrm, which replaced Frostbite after it was damaged beyond repair by Supernova.
Ironside3 rips away Wyrm's front wedge
Ironside3 started the battle by moving away from Wyrm before its weapon was up to speed. Ironside3 then moved towards its opponent and connected with a blow which ripped Wyrm's front wedge off. A side attack on Wyrm while it was in Shunt's CPZ left one of Wyrm's side panels and a wheel hanging off before the next attack from Ironside3 knocked it off completely.
- "That's a wheel off, but he's still going!"
- — Louise Hemstock
Ironside3 removes a second wheel from Wyrm
Now on three wheels, Wyrm continued to limp around, with one more hit rendering Wyrm immobile. Ironside3 then darted over the Pit, where it got itself stuck for a short period, before it got itself free and then knocked off another wheel from Wyrm. With Wyrm immobilised, cease was called, and Ironside3 picked up 3 points.
- Dara Ó Briain: "You went back a couple of time too often I feel. There was at least one little nibble you took, just, I think, therapeutically for yourself."
- Adam Lewis: "He's got the other side - it's okay! So hopefully just working on one side isn't too bad!"
- — The interview after Ironside3's successful knockout of Wyrm
In its final Head-to-Head battle, Ironside3 faced Supernova - a robot which it needed to beat to ensure its place in the Heat Final.
- Dara Ó Briain: "Are you confident? Because you seem slightly nervous at the moment."
- Louise Hemstock: "We're alright - we're just thinking everything through, and we'll have a look when we move up to the arrows, see how everybody is looking and go from there."
- — Team Outlaw keep their cards close to their chest before the crucial Head-to-Head battle between Ironside3 and Supernova
Ironside3 connects with a damaging first hit
Ironside3 quickly got its spinning bar up to speed and connected with a damaging first blow to Supernova, which left it with limited mobility. With Supernova unable to defend itself, Ironside3 targeted its wheels, and a barrage of attacks left Supernova immobilised on the edge of Shunt's CPZ. Supernova was then counted out and cease was called, confirming Ironside3's victory and securing its place in the Heat Final against Pulsar.

Ironside3 is inspected for damage after defeating Supernova
- "We've had some brutal fights and she's showing it! The belt's actually turned around. The pulley's that damaged we can't repair it here - we need a lathe. So we just have to go in and fight the good fight."
- — Adam Lewis before the Heat Final

Ironside3 slams Pulsar into submission
Ironside3 connected with the first blow, although it caused little trouble for Pulsar. Ironside3 moved away and got its bar up to speed again, before striking a hit to the left side of Pulsar.
- "Big hit from Ironside3. That may well have stilled the beating heart within the Pulsar."
- — Jonathan Pearce

Ironside3 continues to punish the beaten Pulsar
This hit left Pulsar unable to move, and it was counted out after a final barrage of blows from Ironside3. This meant that Ironside3 had won the Heat Final, and progressed to the Grand Final as the winner of Heat 4.
- "I genuinely think we're probably the only two left standing out of all of it, and I'm just so happy to be at the top."
- — Adam Lewis to Angela Scanlon after Ironside3's victorious Heat Final battle
In its Grand Final Group Battle, Ironside3 faced newcomers Concussion and the Series 8 runner-up Carbide.

Ironside3's srimech is damaged by Carbide
In order to get its bar up to speed, Ironside3 hung around near its starting position in the opening seconds, while Carbide caused key damage to Concussion straight away. Ironside3 then went towards Concussion itself, but crossed paths with Carbide in doing so, and in trying to avoid Carbide, Ironside3 suffered severe damage to its srimech. Ironside3 then engaged with Concussion with a short rally of glancing blows.
- "Concussion in trouble here, and the other teams are moving in for the kill."
- — Jonathan Pearce

Ironside3 and Carbide surround the limping Concussion
Ironside3 moved away into space again, before both Ironside3 and Carbide surrounded Concussion at the same time, where both machines took their turn at dishing out further damage. A final blow from Carbide crashed Concussion towards the Arena Tyre, which then deflected it into Shunt's CPZ. In the countdown time for Concussion's immobility, Ironside3 and Carbide squared off without engaging with each other, before cease was called.
- Angela Scanlon: "Ironside, I felt like that you guys just hung back and said we'll just sit this out."
- Adam Lewis: "We got involved a little bit! We gave a few tickles out!"
- — Ironside3's less explosive role in the demise of Concussion is brought up post battle
In the pits afterwards, Team Outlaw inspected the damage suffered by Carbide, and the self-righting mechanism was found to be beyond repair, which put it in a handicapped position for its first Head-to-Head against the full-pressure flipper, Eruption.
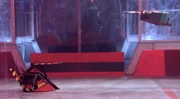
Ironside3 is thrown through the air
With no srimech, Ironside3 ran away from the pursuing Eruption and got its bar up to speed. Ironside3 then turned into Eruption and caught the middle of its flipper with a hit. Eruption then quickly slipped underneath Ironside3 and attempted to throw it over, but Ironside3 managed to land just outside of the reach of Eruption's flipper. After throwing itself over with its mistimed flip, Eruption self-righted and then came onto the attack - this time connecting with a clean flip which threw Ironside3 through the air, although Ironside3 landed on its wheels.
- "Oh! Mighty flip from Eruption! We've seen that throughout this series of Robot Wars, and Ironside3 now tactically running away."
- — Jonathan Pearce

Ironside3 is overturned
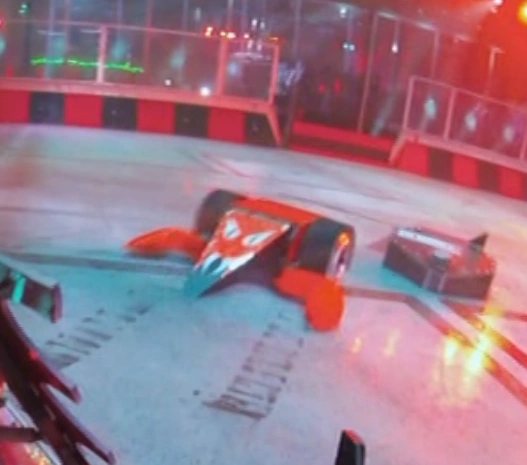
Ironside3 was forced onto the back foot again by the charging Eruption, and after failing to turn quickly enough inside a CPZ, Ironside3 was caught by Eruption, and was bundled over. Unable to right itself, Ironside3 was counted out, and Team Outlaw's first Head-to-Head battle in the Grand Final ended in defeat.
- "We're dead, we're dead. Game over."
- — Trevor Wright
In its second Head-to-Head battle, Ironside3 faced the severely patched up Aftershock after it was torn apart by Carbide in its previous battle. The pressure was also on for Team Outlaw, as a defeat would end any chances of Ironside3 appearing in the Grand Final championship battle.

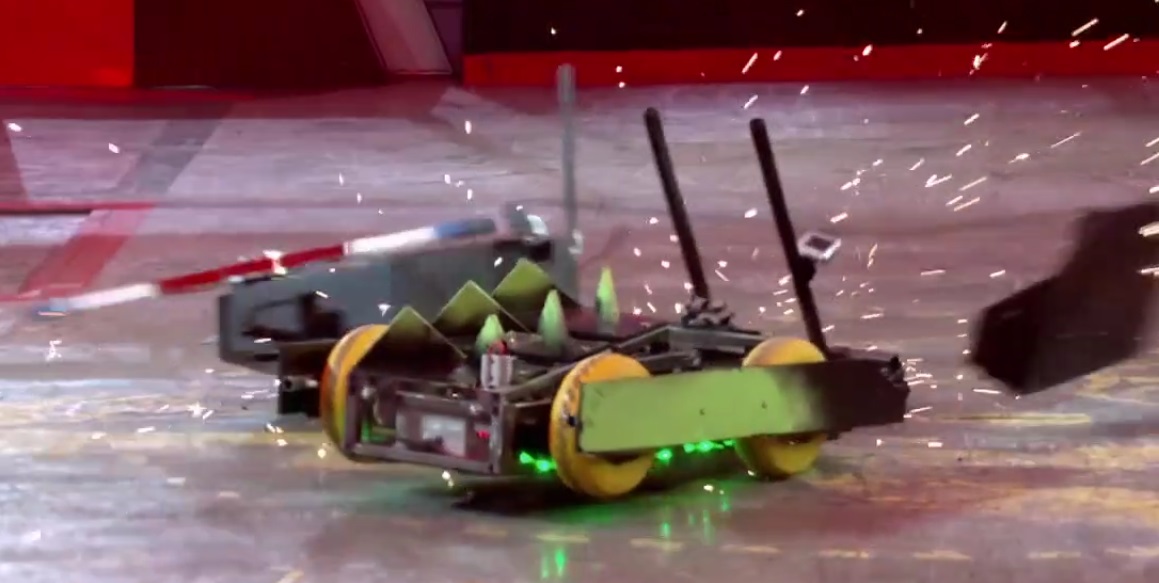
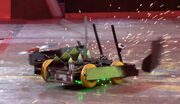
Ironside3 crashes into Aftershock
Once again, Ironside3 was forced into an early retreat as Aftershock got its weapon up to speed the quicker out of the two. Ironside3 then turned around and the meeting of the two machines saw Aftershock sustain significant bodywork damage as well as sending Ironside3 up, off the arena floor. Aftershock responded quickly, and sent Ironside3 cartwheeling through the air. Ironside3 landed safely on its wheels, while Aftershock was stunned for a short period as its weapon motor came under a shower of sparks. Ironside3 hung in the middle of the arena and then met the charging Aftershock, which was now weaponless. Another collision between the two sent more shards flying from Aftershock.
- "Good battle, this!"
- — Jonathan Pearce
Aftershock is knocked out by an Arena Spike
Ironside3's weapon then came to a stop and it moved away to get it working again. Ironside3 met Aftershock side on and knocked it over the Arena Spikes, which promptly shot up and sent Aftershock over. With its weapon not working, Aftershock was unable to self-right, and a victorious Ironside3 celebrated in the centre of the arena.
- "Now we really need them to do us a favour and have a good go at Eruption."
- — Adam Lewis explains why Ironside3 didn't go in for the kill after Aftershock was thrown over
Ironside3 went into its final Head-to-Head battle against guaranteed finalist, Carbide, and with the second robot in the championship battle still not decided, Ironside3 needed to beat Carbide to give it any chance of earning a place in the final outright, otherwise, Ironside3's fate would be out of its own hands.

The weapons of Ironside3 and Carbide collide
Ironside3's weapon damages the wall as Carbide pursues
Ironside3 was quickly backed next to the arena wall, buckling the wall slightly as Carbide closed in while Ironside3 spun its weapon up to speed. Both machines then traded hits with their bars before Ironside3's weapon smacked against the arena side gate panel. Ironside3 then charged away into space before turning its bar towards Carbide, but contact between the two knocked Ironside3 onto the Floor Flipper, where it was lifted off its wheels. Carbide then came in with a rally of hits before Ironside3 retreated again. Ironside3 turned around once more, and this time dealt a clean hit to upper region of Carbide. Carbide reasserted itself with a hit to the back corner of Ironside3, and after this, Ironside3's weapon stopped working.
- "Ironside3 worn down into submission - the weaponry has stopped."
- — Jonathan Pearce
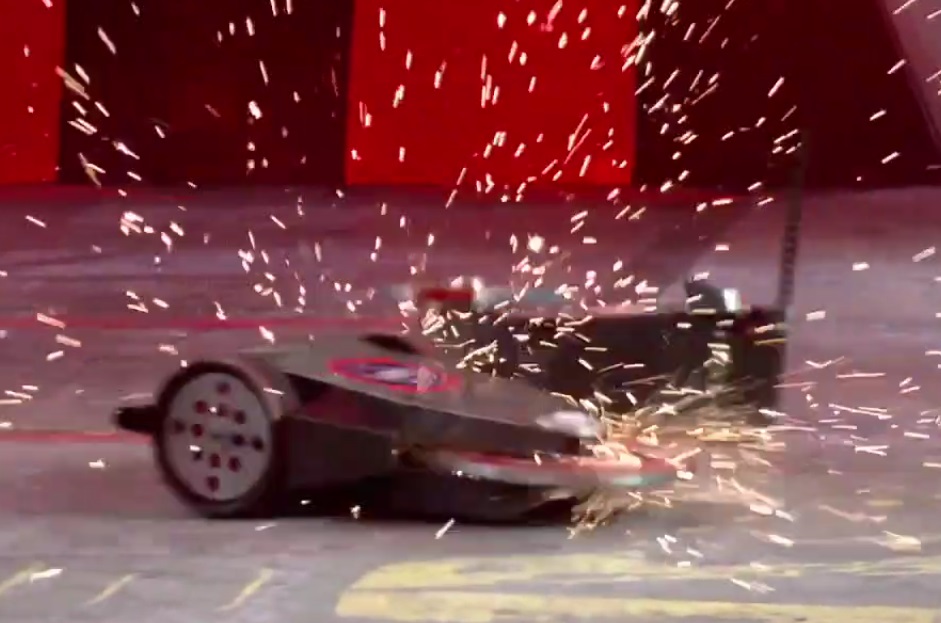
Ironside3 is immobilised in a shower of sparks
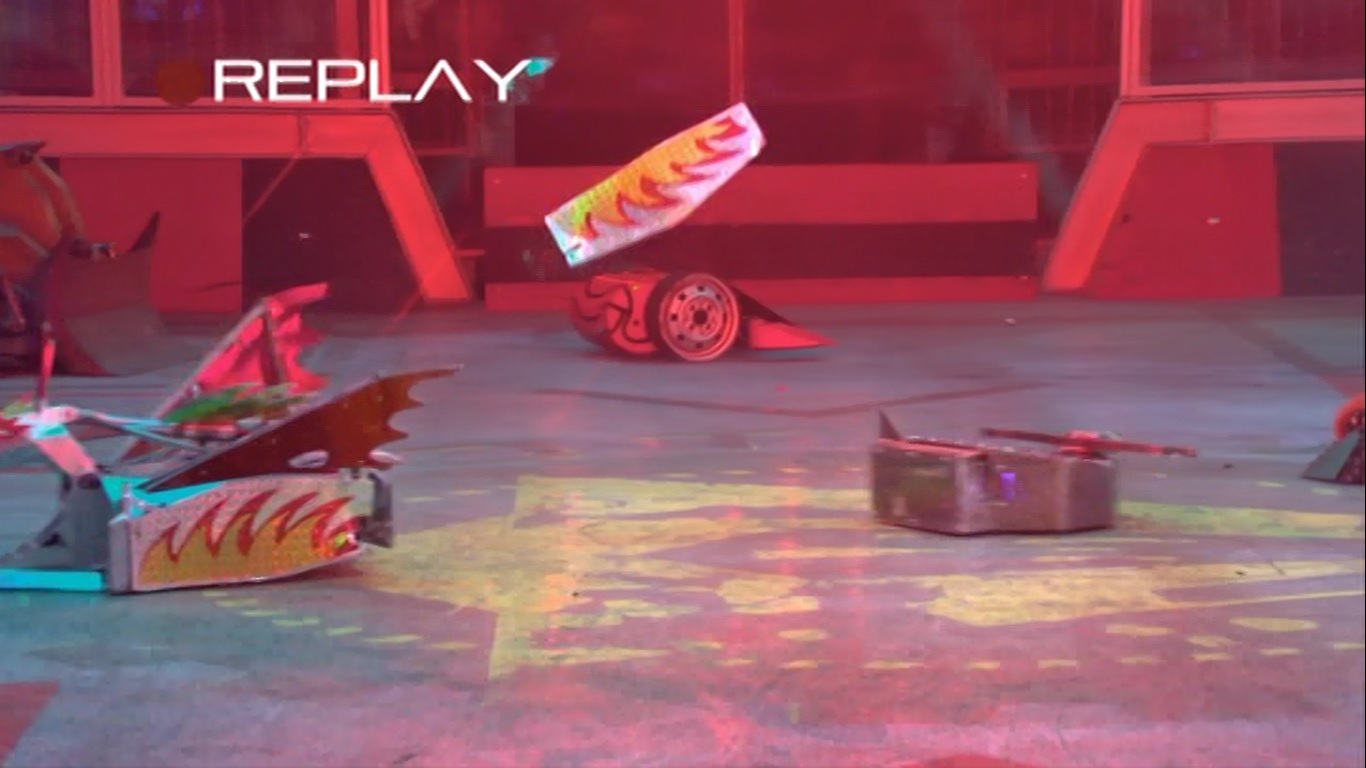
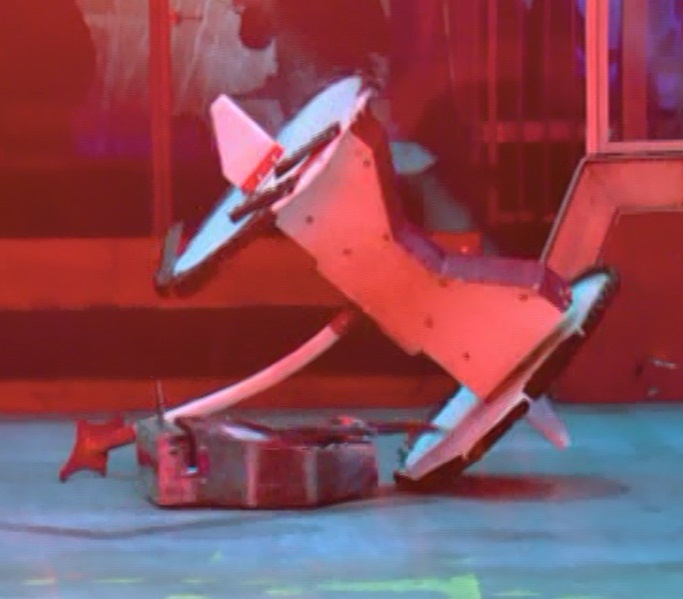
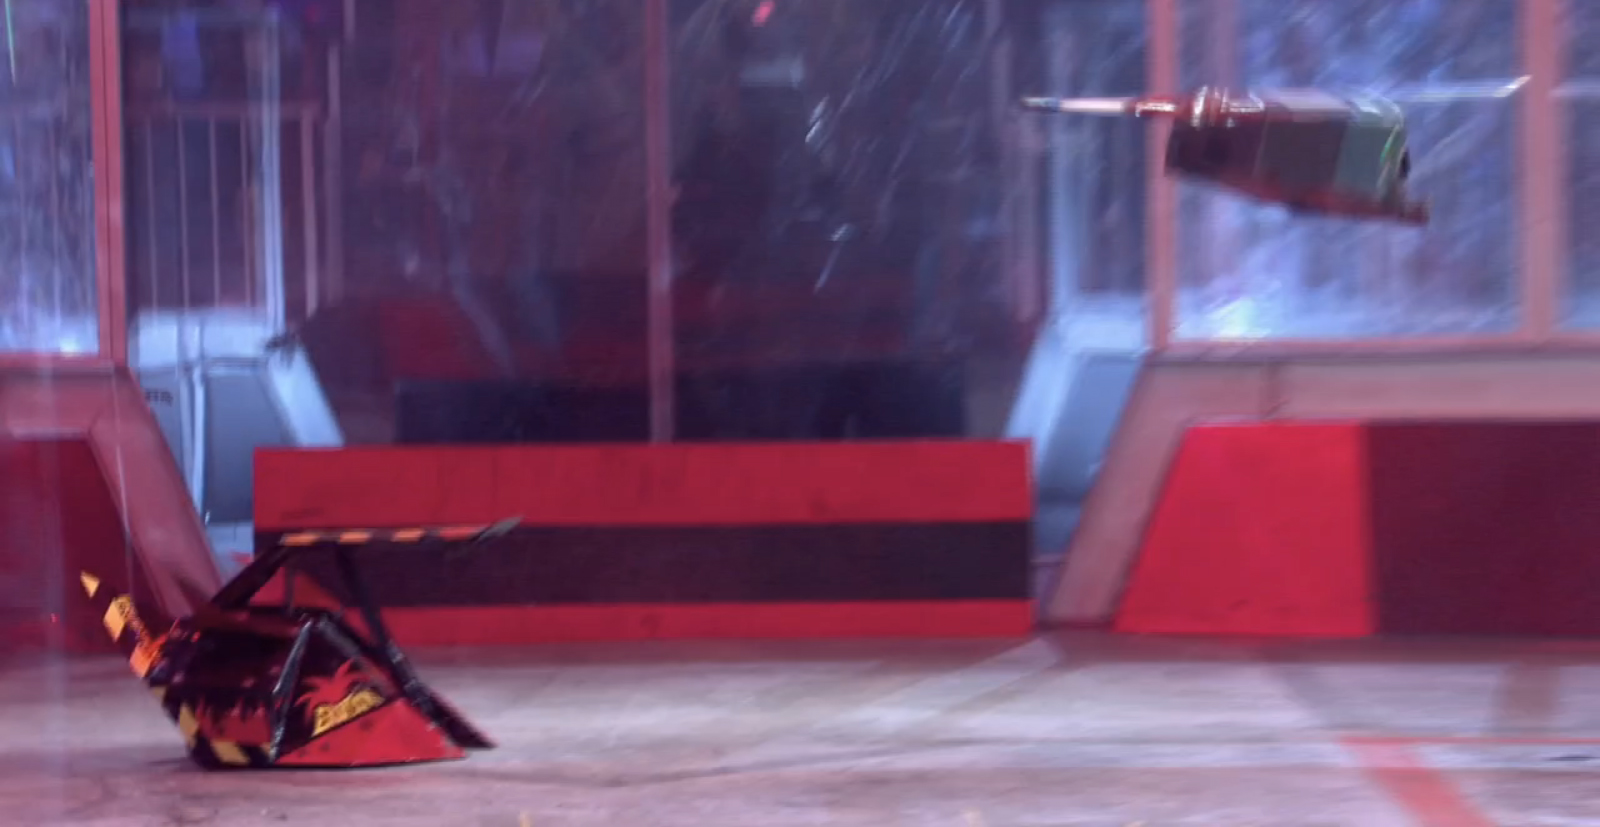
Ironside3 was then thrashed into Shunt's CPZ, where it was axed as it attempted to escape. After moving away from Shunt's territory, Ironside3 was met with one final hit from Carbide which rendered Ironside3 immobile. Outside of the televised broadcast, the immobile Ironside3 was pushed into the pit by Shunt[2], concluding its battle in resounding defeat.
The split chassis of Ironside3 after its final defeat
With Ironside3's final Head-to-Head battle ending in a loss, it now needed Aftershock to defeat Eruption by a knockout to send the remaining machines to a three-way points tie, where the judges would then decide which robot would fight Carbide in the final. Unfortunately for Ironside3, Eruption edged out Aftershock, which meant that its total of six points was enough to face Carbide for a second time. As a result, on a total of three points, Ironside3 finished third in Series 9 of Robot Wars.
Results
| IRONSIDE3 - RESULTS | ||
| Series 8 | ||
| Series 8 - UK Championship Round 2, Third Place | ||
| Heat 5, Group Battle | vs. Chompalot, Pulsar, Thermidor 2 | Qualified |
| Heat 5, Head-to-Heads | vs. Beast | Won via KO (3 points) |
| Heat 5, Head-to-Heads | vs. Gabriel | Won via Judges' decision (2 points) |
| Heat 5, Head-to-Heads | vs. Pulsar | Lost (0 points) |
| Series 9 | ||
| Series 9 - UK Championship Third Place | ||
| Heat 4, Group Battle | vs. Apex, Crushtacean, Pulsar | Qualified |
| Heat 4, Head-to-Heads | vs. Pulsar | No winner declared (2 points) |
| Heat 4, Head-to-Heads | vs. Wyrm | Won via KO (3 points) |
| Heat 4, Head-to-Heads | vs. Supernova | Won via KO (3 points) |
| Heat 4, Heat Final | vs. Pulsar | Won |
| Grand Final, Group Battle | vs. Carbide, Concussion | Qualified |
| Grand Final, Head-to-Heads | vs. Eruption | Lost via KO (0 points) |
| Grand Final, Head-to-Heads | vs. Aftershock | Won via KO (3 points) |
| Grand Final, Head-to-Heads | vs. Carbide | Lost via KO (0 points) |
Wins/Losses
- Wins: 9
- Losses: 3
- Draws: 1
Series Record


| Main Series | Ironside3 Series Record |
|---|---|
| The First Wars | Did not enter |
| The Second Wars | Did not enter |
| The Third Wars | Robotic Soccer with Velocirippa |
| The Fourth Wars | Entered with Velocirippa |
| The Fifth Wars | Entered with Velocirippa |
| The Sixth Wars | Entered with Mighty Mouse Withdrew Velocirippa |
| The Seventh Wars | Entered with Mighty Mouse Entered with Velocirippa |
| Series 8 | Heat Round 2, Third Place |
| Series 9 | Grand Final, Third Place |
| Series 10 | Not selected with unspecified robot |
| Robot Wars Extreme | Appearances |
| Series 1 | Entered with Velocirippa |
| Series 2 | Entered with Mighty Mouse and Velocirippa |
NOTE: Trevor Wright's machine, Meggamouse, was also entered into Series 9 by Team Tilly, also applying for Series 10 without being selected
Outside Robot Wars


Ironside3 did not compete outside of Robot Wars, only appearing as a static display at Robots Live! and local motoring events. However, its featherweight predecessor Ironside fought exclusively at live events, and was later sold to Team Tilly who restored the machine to working condition in May 2020. The second version, Ironside 2, was built in 2012 and later competed in the UK Featherweight Championship in 2014, where its spinning disc was swapped for a spinning bar, also returning for the 2016 championship. Ironside 2 was gradually updated over time until it heavily resembled its successor, where it became used as a test bed for Ironside3.
Team Outlaw most commonly participated in live heavyweight combat with YOTON (Adam Lewis and Louise Hemstock) and Meggamouse (Trevor Wright). For more information, see the Team Outlaw page.

Robin Hood at Clash Bots
In early 2018, Team Outlaw competed in the Chinese TV show Clash Bots, with a robot remarkably similar to Ironside3, named Robin Hood. It uses the same core design as Ironside3, but with a new self-righting mechanism, and a green colour-scheme to reflect its namesake. However, it suffered an early first-round loss to Nightmare Strangler, delivering only two hits before Robin Hood suddenly lost all power, and was eliminated from the competition.
Team Outlaw were also revealed to be competing in the 2020 season of BattleBots with Spitfire, again an advancement of the design pioneered by Ironside3. The robot is in a relatively complete state and intends to compete in the TV season when possible.
Trivia
- Ironside3 became the first robot from a team who competed in the original series to reach the Grand Final of the revived series after winning a heat.
- The Ironside3-Pulsar rivalry became one of only three rivalries (after Team Scutterbots/Team Knightmare and Team 101/King Buxton) where both teams reached a semi-final by defeating the other.
Honours
References
External Links
- Team Outlaw - Ironside3 Facebook page
- Ironside3 (Series 8) on the Robot Wars website
- Ironside3 (Series 9) on the Robot Wars website
| ||||||||||||||||||||
| ||||||||||||||||||||||||||||||||
| |||||||||||||||||||||||||||||||||||